Artificial Grass Installation Services in San Diego
Wondering if it’s time for your own artificial grass installation? Are you sick of watering your grass and all the maintenance involved in keeping up your lawn? If so, artificial grass may be a great choice for you. Not only will you be able to eliminate mowing your lawn, but you won’t have to water, and your synthetic grass will look green and lush year-round.
We provide expert artificial grass installation all over San Diego, from Escondido to 4S Ranch, as part of our full range of local landscape design services.
Get A Free Turf Estimate
Why Install Artificial Grass?
If you have a large grassy lawn in the front of your house which is eating at your monthly water bill, synthetic turf will drastically reduce your monthly bill and instantly add curb appeal while transforming the aesthetic of your house. Synthetic turf is also a fantastic choice for people who go out of town on business trips, go on a lot of vacations, or rent the property out. After your turf installation, you won’t have to worry about watering while you are out of town, and you surely won’t have to worry about renters properly attending to the lawn.
Additionally, turf is growing in popularity for pet owners. Call today to learn how artificial grass is a safe, sanitary, and low-maintenance lawn option for homes with dogs.
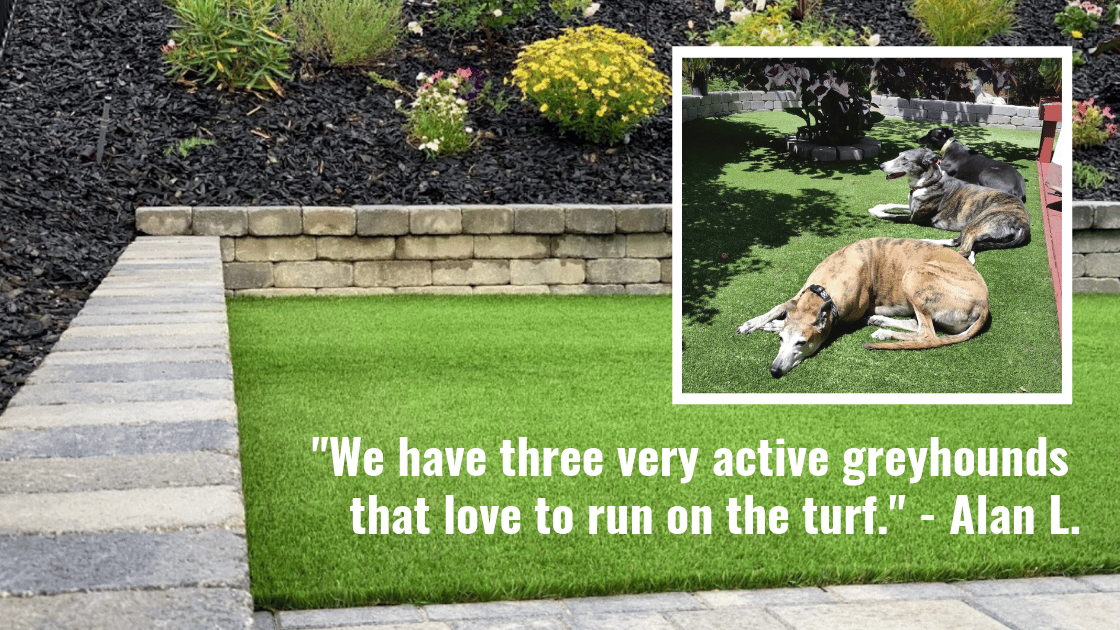
The Artificial Turf Installers San Diego Residents Prefer
We have over 25 years of experience as synthetic grass installers and are able to install synthetic grass in San Diego. Reach out to us to start discussing your artificial grass project today! To learn more about the costs of artificial grass, read our guide on artificial grass costs or check out our artificial grass calculator.
Artificial Turf Options:
Artificial Grass Installation Advantages
- Instantly Increase Your Curb Appeal & Property Value
- Drastically Reduce Your Monthly Water Bill
- No More Mowing Your Lawn
- Enjoy a Lush Green Lawn With Our Urea Z Solution for Your Pet Turf
Artificial Grass Installation Phases
-
Synthetic lawn design and planning
One of our Professional Design Consultants will assist you with your design and plan in an effort to come up with a clear picture as to your overall vision and goals for this project. The design and diagram will determine the scope of the project. During this process we will also be looking to create as few seams as possible, which will provide for a much more real looking lawn upon completion. At this point we will be able to provide you with an accurate estimate in regards to your investment. We can continue to alter the scope until we meet your project needs. Once the design is finalized we will use the diagram to figure out the appropriate quantities of material to order.
-
Pre-demolition
Before the demolition can commence, all utilities (electrical, gas, water, etc.) including all sprinklers must be properly located to eliminate unnecessary problems. Depending on the customer’s preference, the sprinkler system can be capped for use at a later point in time, or we can completely remove it altogether. Any additions or changes to the existing utilities must be accounted for at this time.
-
Demolition
A bob-cat (where applicable) will be used to demolish your existing soft-scape and/or hard-scape surface. In areas where the bob-cat cannot access, or if a bob-cat is not necessary, other demolition tools be used to remove the hard-scape and/or soft-scape. Saw-cutting may be necessary along areas where the foundation is protruding into the usable space in the front, back or side-yard areas.
-
Excavation
We will excavate 2 1/2 to 4 1/2 inches from final grade.
-
Grading & Drainage
At this point if drains need to be installed, this is the time to do so as well as account for proper water flow away from your house.
-
Install Optional Border
For aesthetics and structural integrity of the perimeter, we will install bender board or a paver mow strip around the outside of your project, wherever we are abutting up against soft-scape surfaces.
-
Sub-base Compacting
We will use a plate compactor to compact the sub-base. This is crucial as we do not want to have any air gaps in our system. If you skip this step, it will lead to undulations or depressions later on.
-
Base Preparation & Compaction
We will prepare 2-3 inches of Class II Road Base which will be dispersed throughout the entire footprint of your turf project (this is for a Southern California installation as other regions will require different specs). Once the base has been set, we will hose the base down, and compact it until we reach a compaction level of 95%. At this point if the bob-cat drives over the prepared base, you will not see any tiers mark, as it is literally hard as a rock, which is exactly what you want.
-
Weed Barrier Fabric
After the base preparation, we recommend that a weed barrier fabric is installed which will reduce the chances of weeds making their way to the surface of the final installation. {Please Note} In terms of weeds, there is zero guarantee about this. We can do everything in our power to destroy them in terms of what is currently there, however, destroying ALL the root systems is nearly impossible. Weeds along the edges of your turf is where you will see them most often. It is very hard to secure the edges 100%, although we do our very best. Artificial Turf is not synonymous with no maintenance. It means less maintenance than real grass, however, by no means can you get new turf installed and forget about it completely. If you do, it will eventually look shabby. Everything needs maintenance, no matter what a salesman may tell you about their grass…. they all do no matter what.
The caveat here is that if you have pets that will be using your artificial turf as their bathroom then we highly recommend against installing the weed barrier. Yes, the weed cloth is attempting to inhibit weeds but it is also soaking up the urine and if your pets have been doing their business there for a long time, that is going to be very difficult to remove. We recommend Urine Zero to remove the urine odors on your artificial turf.
-
Turf Preparation
Make sure to roll the turf completely out and allow it to sit in the sun during the initial preparation process. Since the turf has been rolled up like carpet, we will want to make sure to eliminate any wrinkles and bunching. If you skip this step, you may see air pockets in your turf later down the line as the artificial grass has a chance to completely settle. With proper planning, proceed to position the turf for installation. The goal is to have as few seams as possible and with proper planning this can be achieved every time. Once the fake grass is positioned properly, remove the excess turf that will not be needed, which will make it much easier to work with.
-
Seaming & Trimming
Once the artificial turf has been perfectly laid out and all the excess material has been trimmed, we are now ready to seam the pieces together. It is important to make sure that all the rolls of grass are laid in the same direction, so that the blades all point the same way. There are several seaming techniques, and the actual technique used on a particular job can vary from job to job depending on the circumstance. The various techniques include utilizing seaming tape in conjunction with adhesives(glue) to sewing to the most popular residential application being tacks and nails. Once the seams have been completed, the final trimming can take place along all the seams and edges of the grass.
-
Border Preparation
To properly secure the border it is a good idea to nail down the perimeter with nails. Use 40-60d nails which are 4-6 inches in length and use them every 1-2 feet around the perimeter of your project.
-
Infill Preparation
To get the turf ready for the infill installation, you will want to use a power broom and sweep the turf in the opposite direction that the blades are pointing. This will prop the blades upright and allow for the infill to properly penetrate the grass to the base of the turf.
-
Infill Installation
Use a standard seed drop spreader to install the infill. The infill is used to help weigh down the turf, assist with blade recovery, soften the feel under your feet, and depending on the actual infill you use, there may be other benefits (i.e. antimicrobial, prevents degradation, reduced heat consumption/overheating). You will need to determine the amount of infill to use in advance because you will want to leave 5/8″ (+/- 1/8″) of the blade of grass exposed. The amount of infill to install will depend on the specific synthetic lawn you choose. The metric will be pounds per sqft, in terms of how many pounds of infill you will need per sqft of artificial grass.
-
Final Trimming & Clean-up
Walk the project to see if there are any blades of grass that are out of place. If everything looks perfect, then hose down your new lawn which will complete the infill install and now your artificial lawn installation is complete and ready for use.
-
MELTING TURF WARNING!!!
Please read this article here: Melting Turf Issue
-
Pet Maintenance
If you have pets that are going to use your newly installed artificial grass as their bathroom, then we highly recommend that you have a bottle of Urine Zero on hand to rid the odors (urine, feces, etc.) so you can enjoy your outdoor space without the smell.