Paver Patio & Walkway in Bostonia, El Cajon
Project Gallery
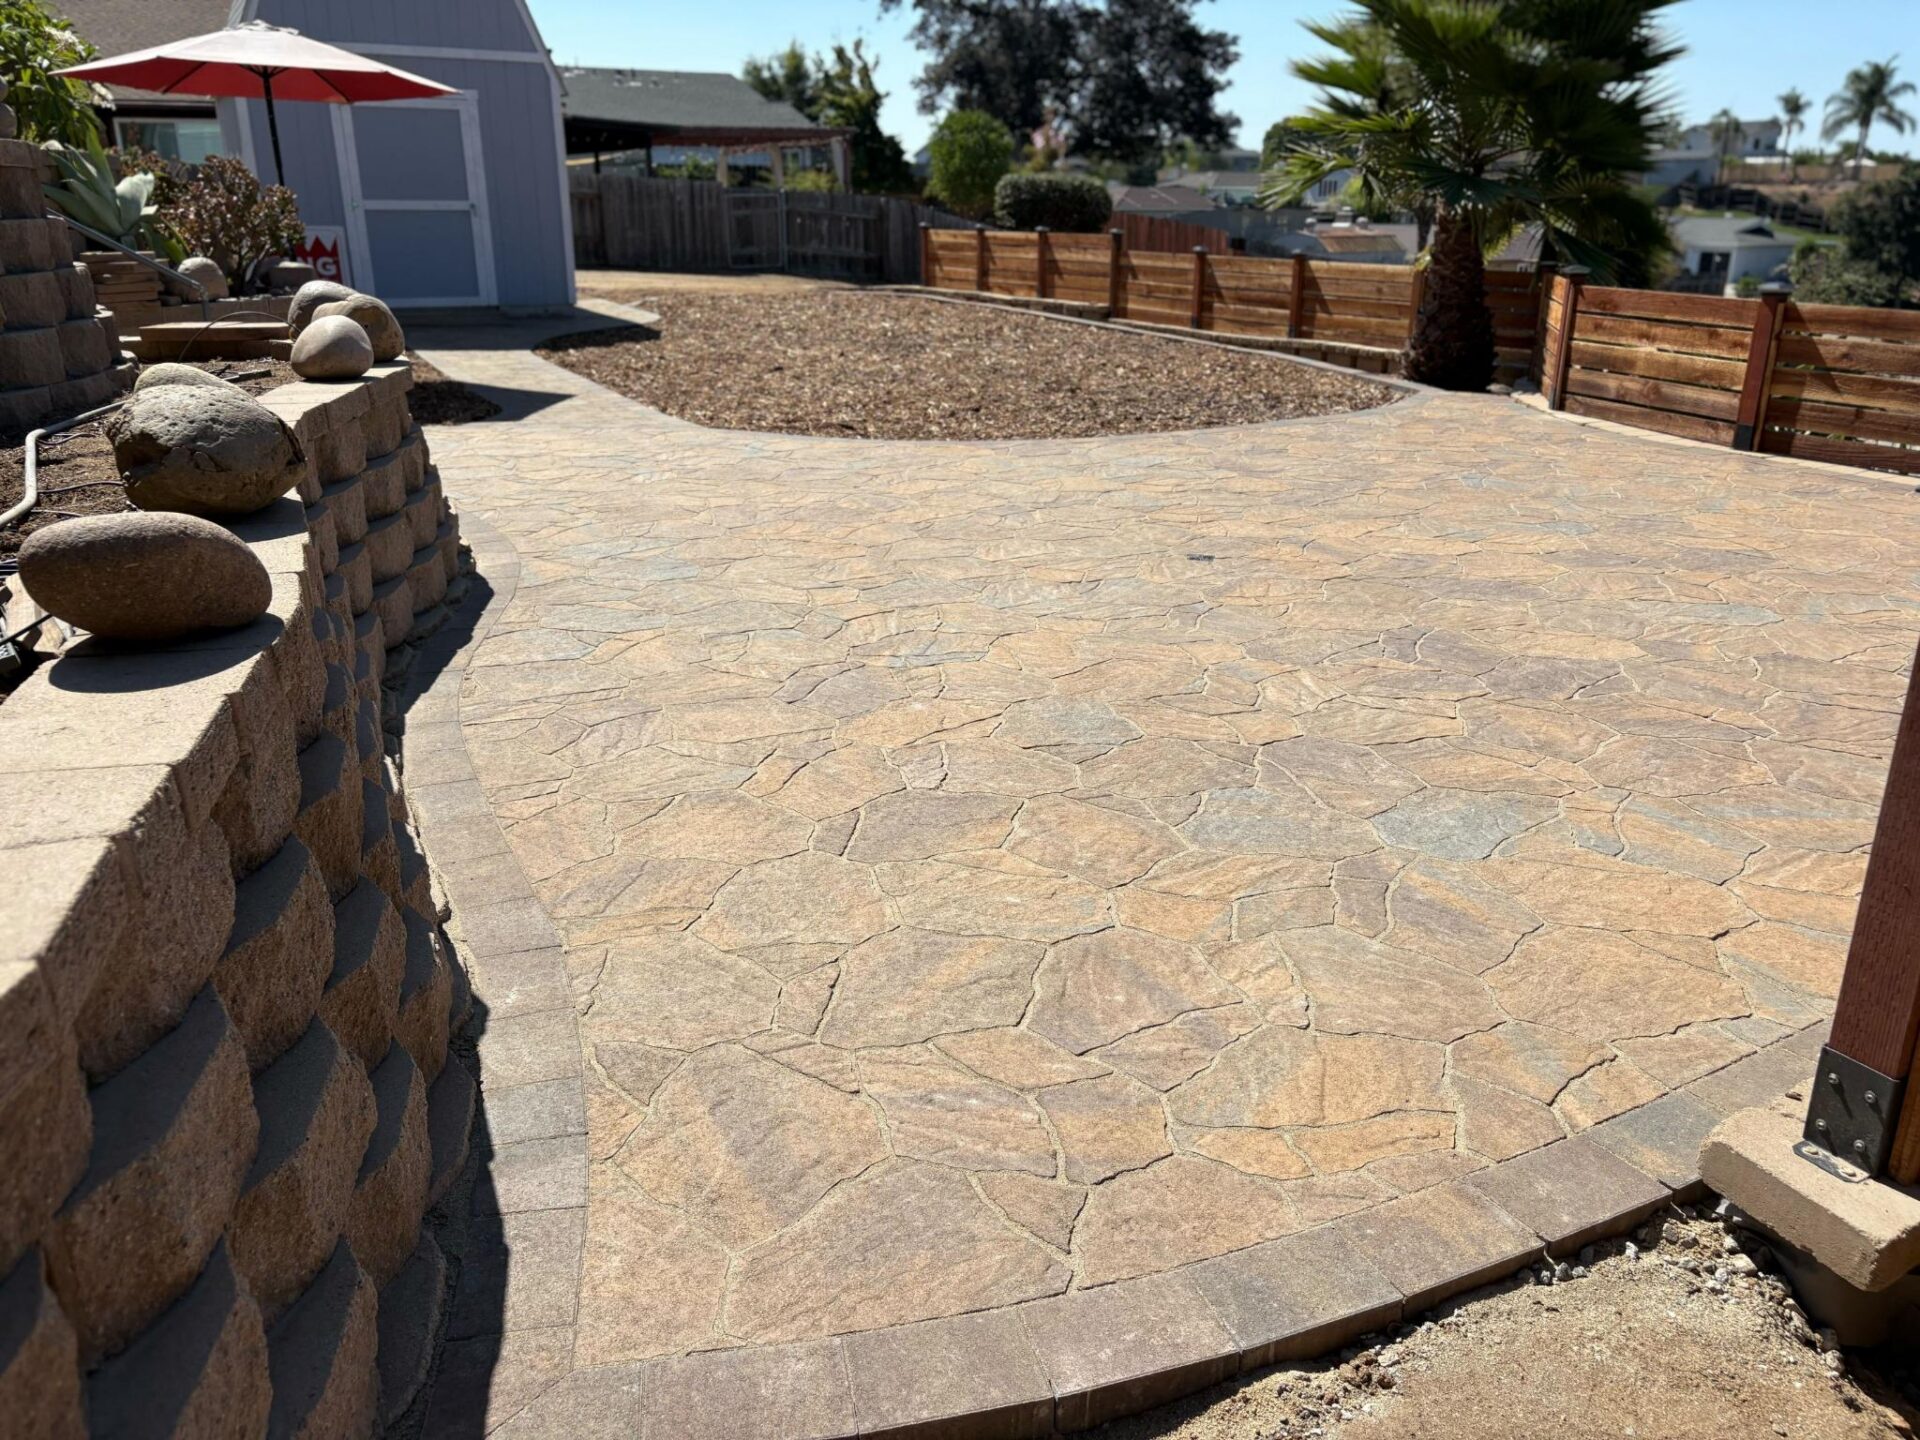
Curved Corsia paver patio in Bostonia with contrast soldier-course border, segmental seat wall, and rear shed in frame.
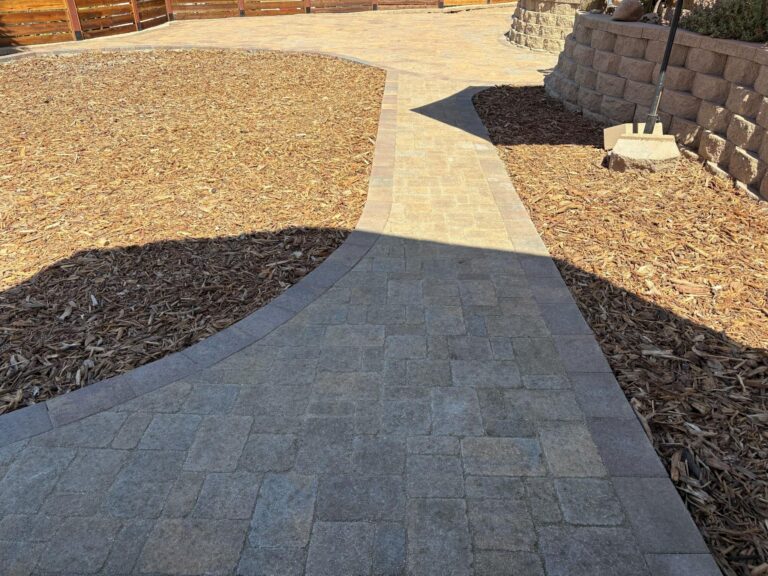
Curved Corsia paver walkway in Bostonia mulch beds with Holland 4x8 soldier-course border running along the field edge.
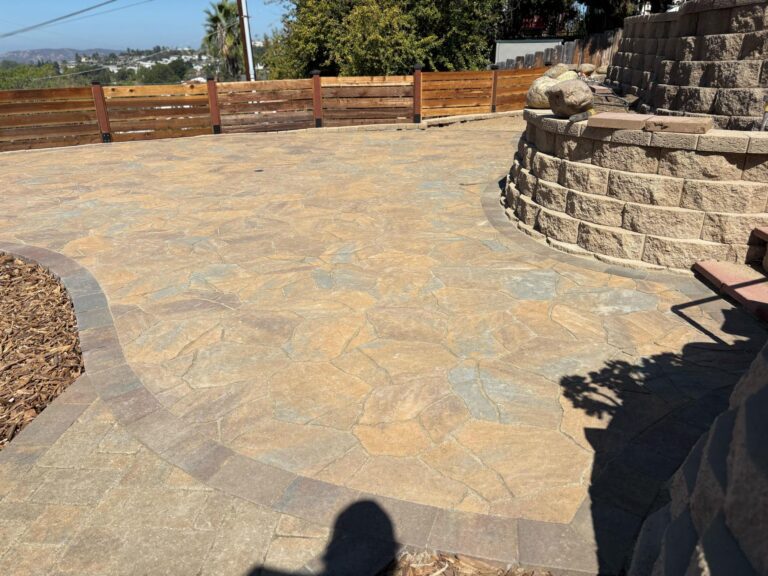
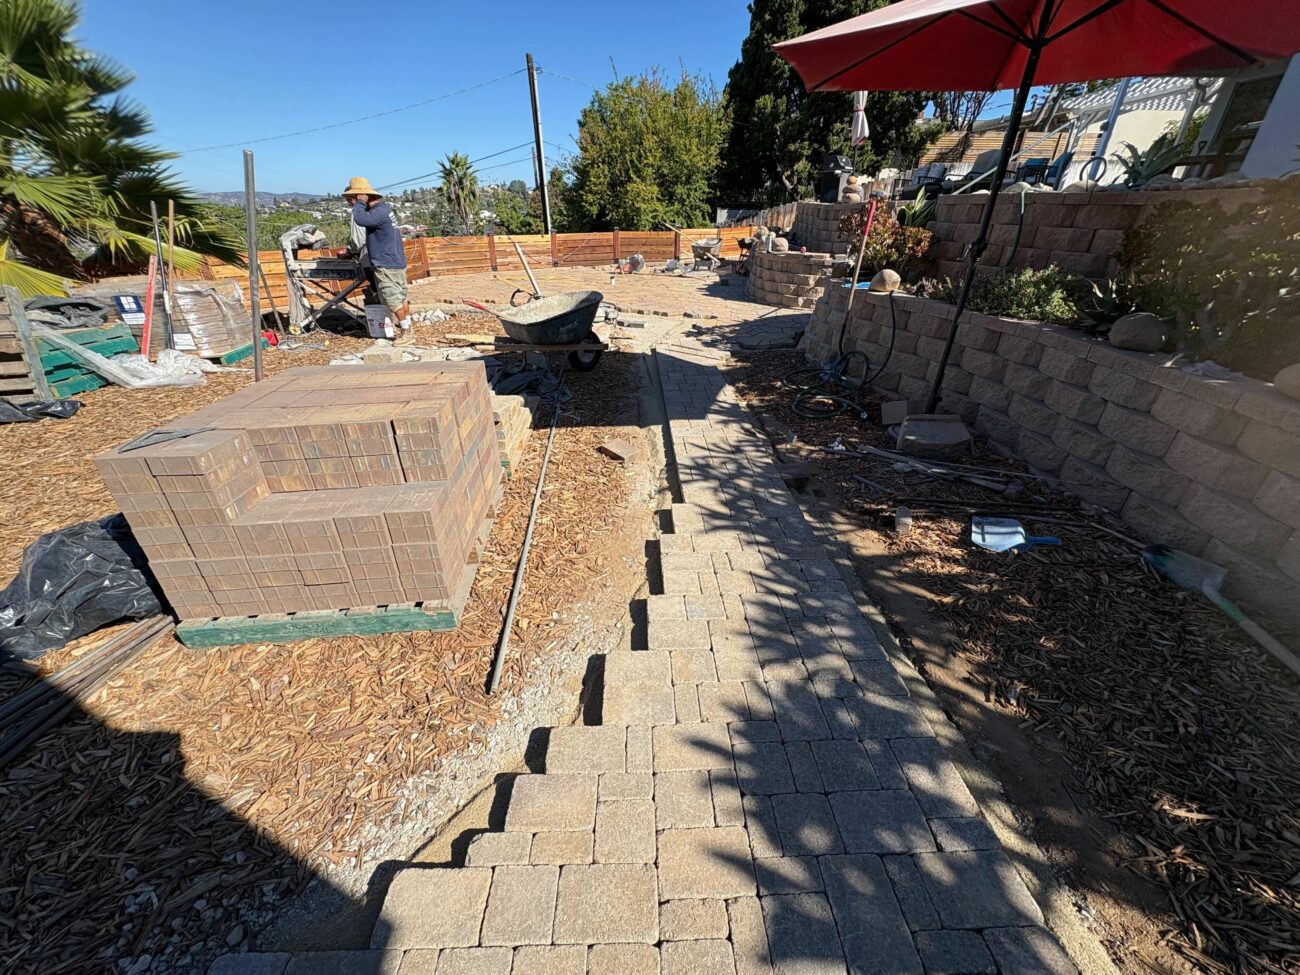
Same slider vantage in Bostonia after build — Corsia four-shape field, Holland 4x8 soldier-course border, segmental seat wall integrated.
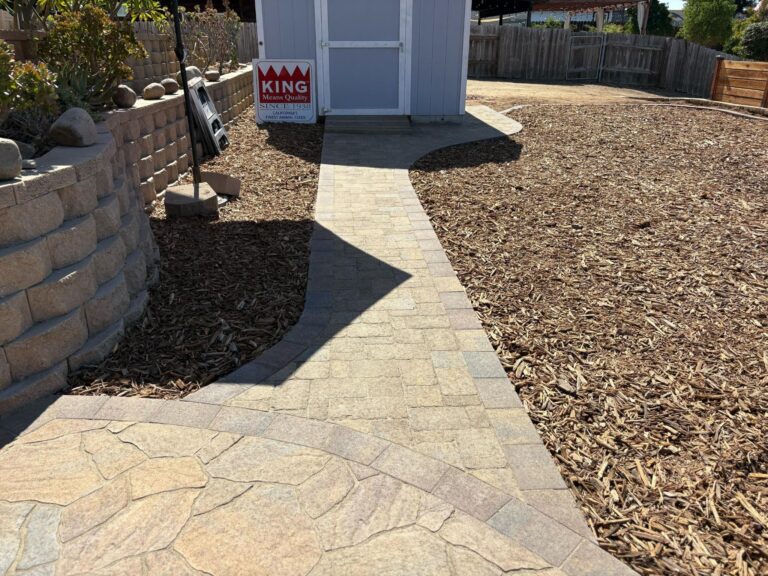
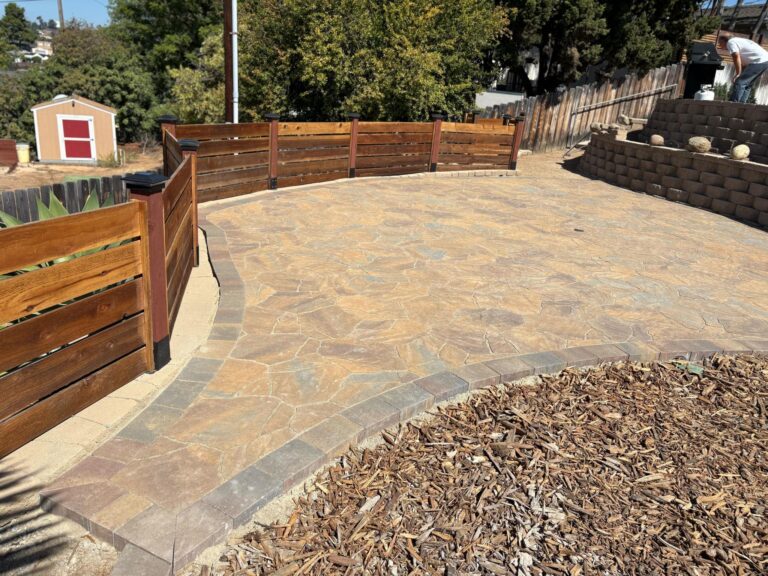
Same gate vantage in Bostonia after build — curved Corsia walkway with circular soldier-course transition at the rear shed.
Project Snapshot
Project Story
Overview
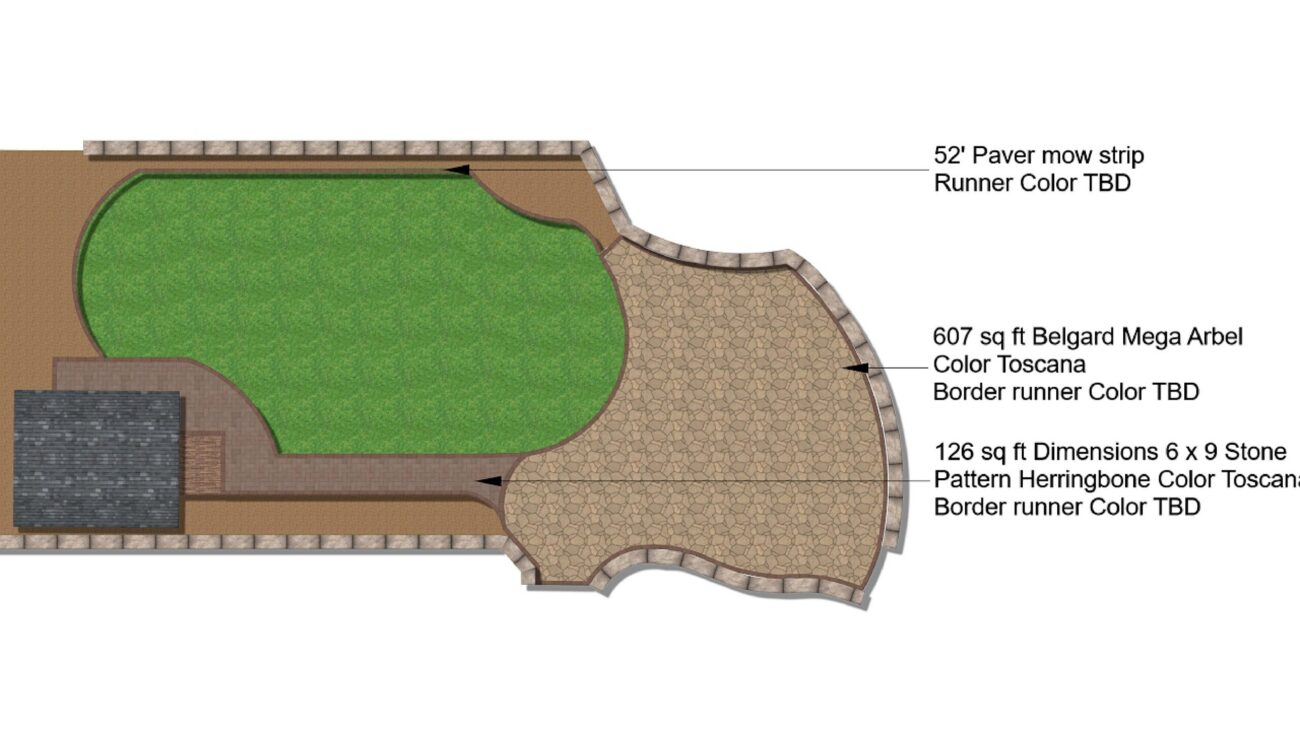
Replaced bare dirt and a worn DG path on a Bostonia hillside with 607 sf of ORCO Corsia pavers in a four-shape flagstone pattern, edged by a Holland 4x8 soldier course and a 52-piece concrete mow strip. A curved walkway runs back to the shed, and a mid-trench drainage retrofit with fabric barrier and corrugated pipe went in without losing a day across the six-day build.
The curved walkway out to the shed turned out to be our favorite part.
The Challenge
- The backyard was unpaved dirt and wood mulch, making the surface unusable for outdoor activities whenever the soil was wet or dusty.
- A compacted decomposed granite path led to the rear shed but had no permanent edge treatment, causing it to erode into adjacent mulch beds.
- Surface water had no defined outlet, and without drainage the low points near the retaining wall held moisture against the existing structure.
What Changed
How INSTALL-IT-DIRECT Helped
Over 1,000 five-star reviews and 1,500+ San Diego homeowners served.
Design & Build
The Plan
ORCO Corsia pavers in four distinct shapes create an irregular flagstone-style pattern; ORCO Holland 4×8 units set as a soldier-course perimeter border provide a contrasting edge
Curved walkway alignment carries traffic from the main patio area to the rear shed, following the natural path already worn into the DG
Excavation to 7.5 inches with native soil compaction and aggregate base prep before bedding sand placement
Geotextile fabric placed against the existing segmental retaining wall to prevent sub-base material from migrating into wall cracks
Corrugated drainage pipe added mid-project to route surface water away from the retaining wall and low points
52-piece concrete mow strip installed along paver edges to lock in the border and separate pavers from adjacent mulch beds; low-voltage lighting was not included in this scope
See the 2D plan drawing
The Build
Pre-Walk and Site Assessment
A pre-construction walk was completed before both the sales rep and homeowner departed on travel. The crew documented the retaining wall condition, confirmed side-yard pallet access, and noted the existing DG path alignment for the curved walkway layout.
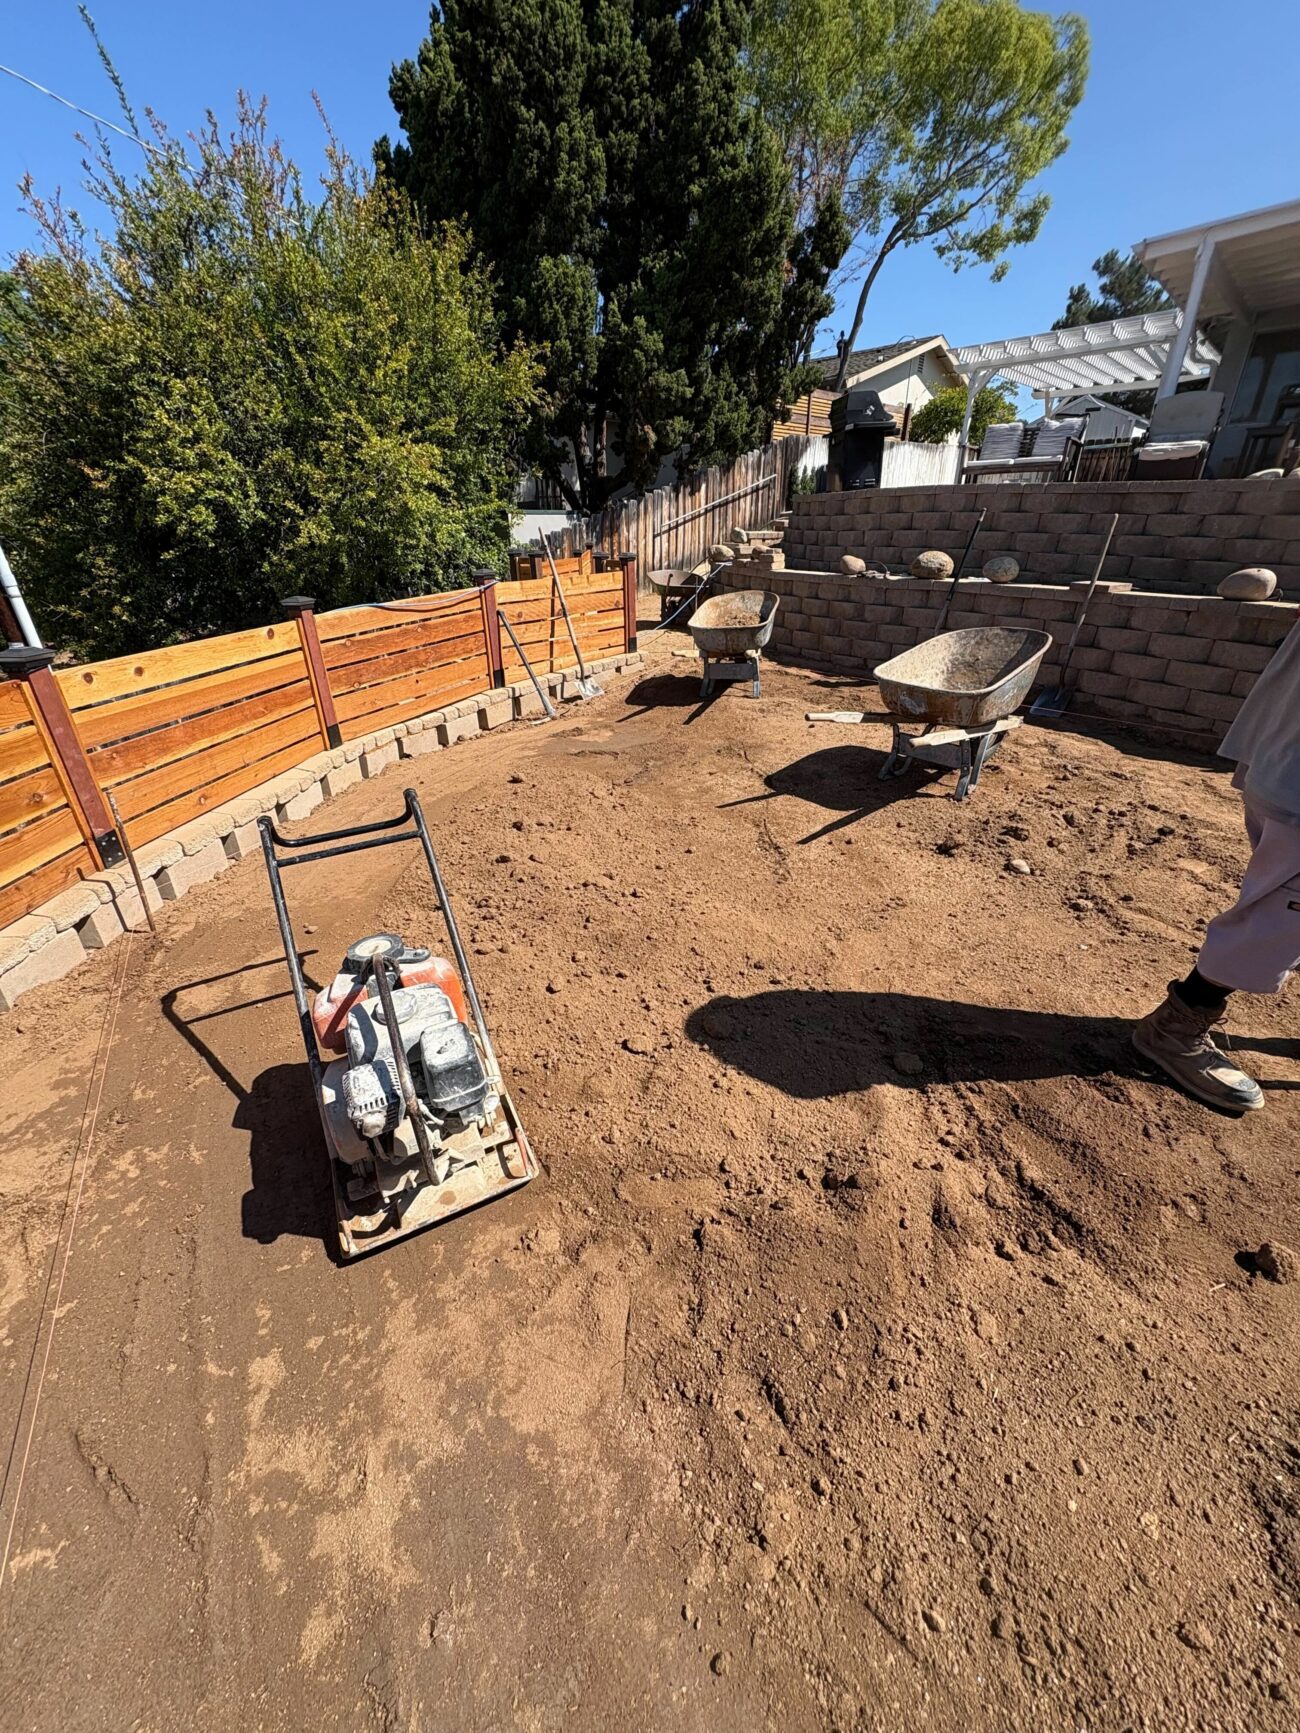
Demo and Base Prep
Demolition of the existing surface and excavation to 7.5 inches began on Day 1 of construction. A plate compactor was used to compact native soils to spec. The first interim payment was collected on this day. Paver pallets were staged in the side yard directly adjacent to the work area.
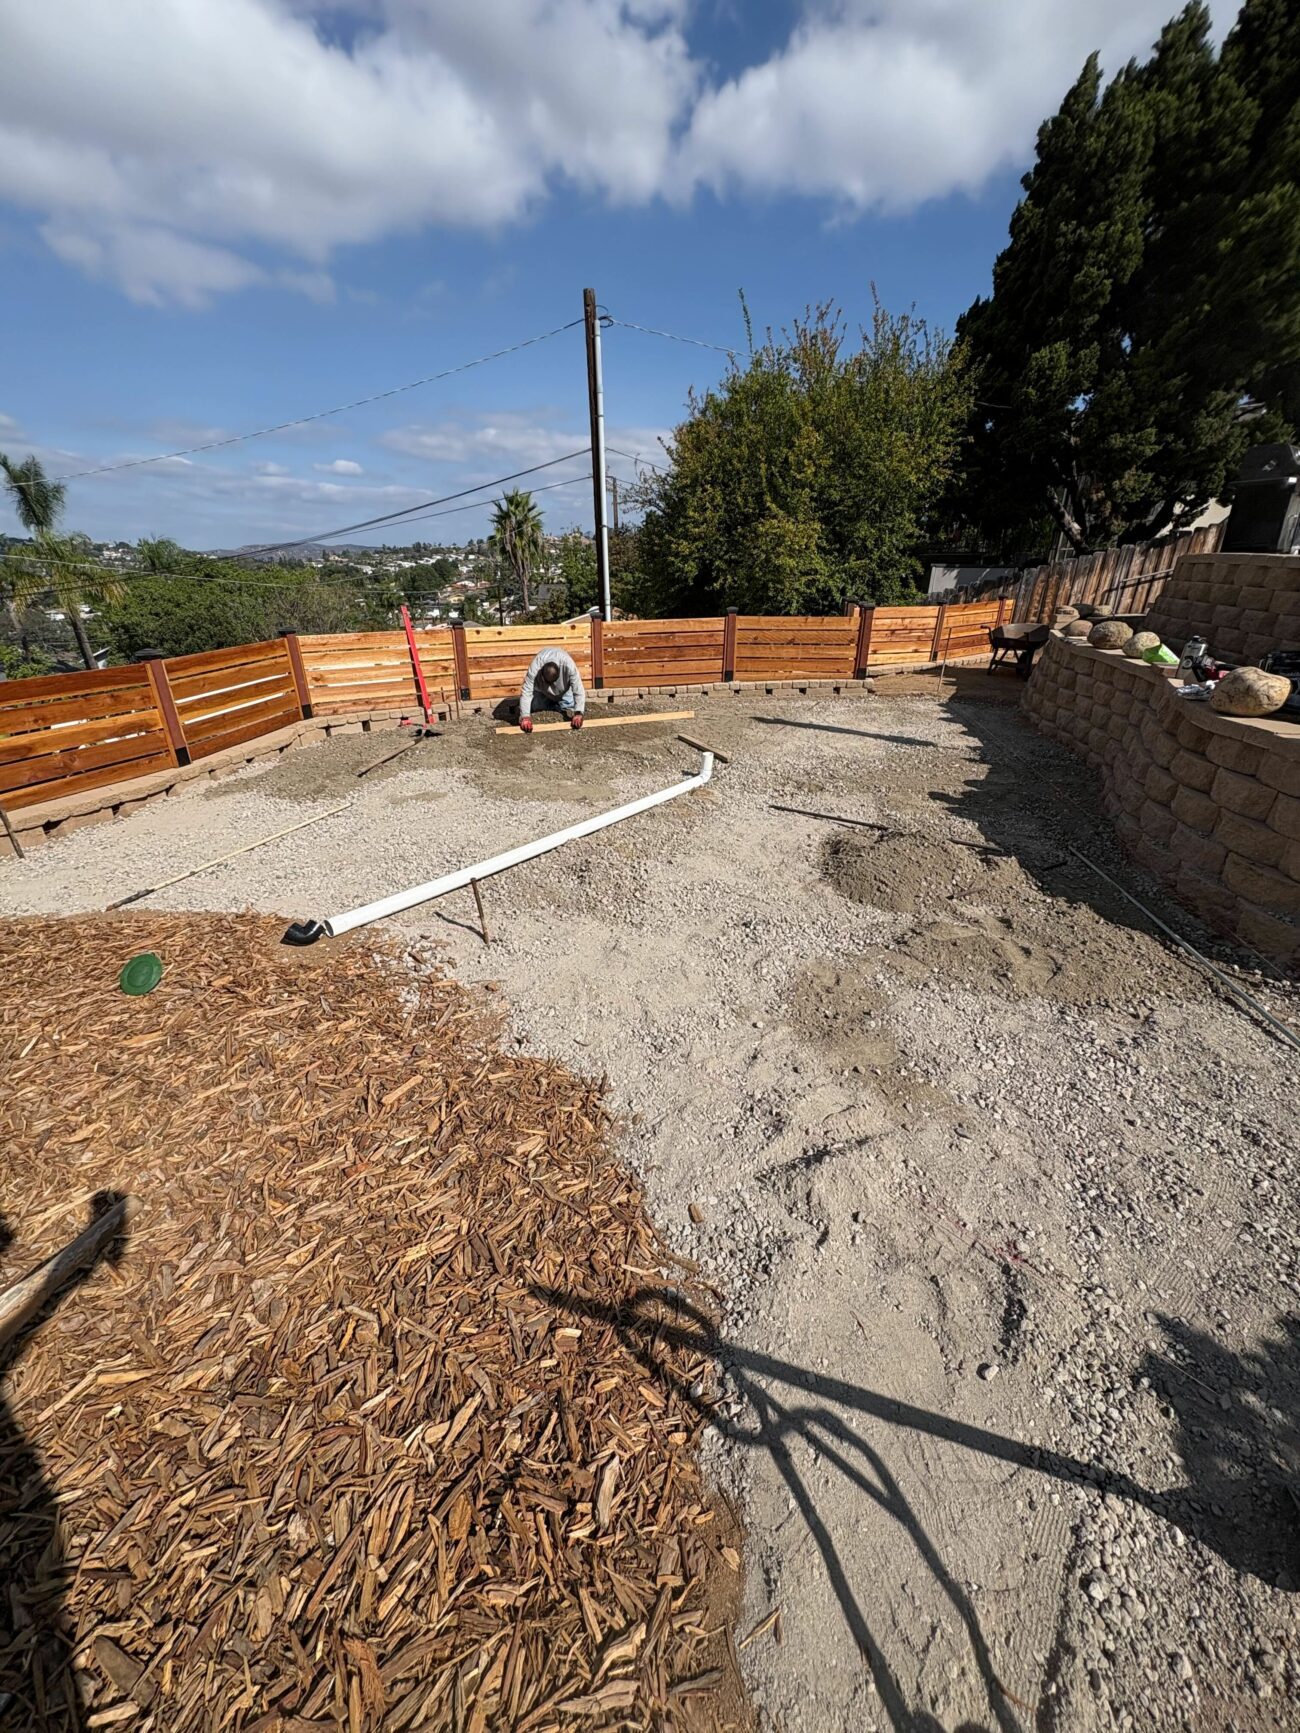
Drainage and Sub-Base Work
Corrugated drainage pipe was added to the scope and installed the following day after the base prep revealed inadequate water routing near the retaining wall. Geotextile fabric was placed against the wall face to block sub-base migration through existing cracks. The homeowner approved the drainage scope adjustment via text the same day.
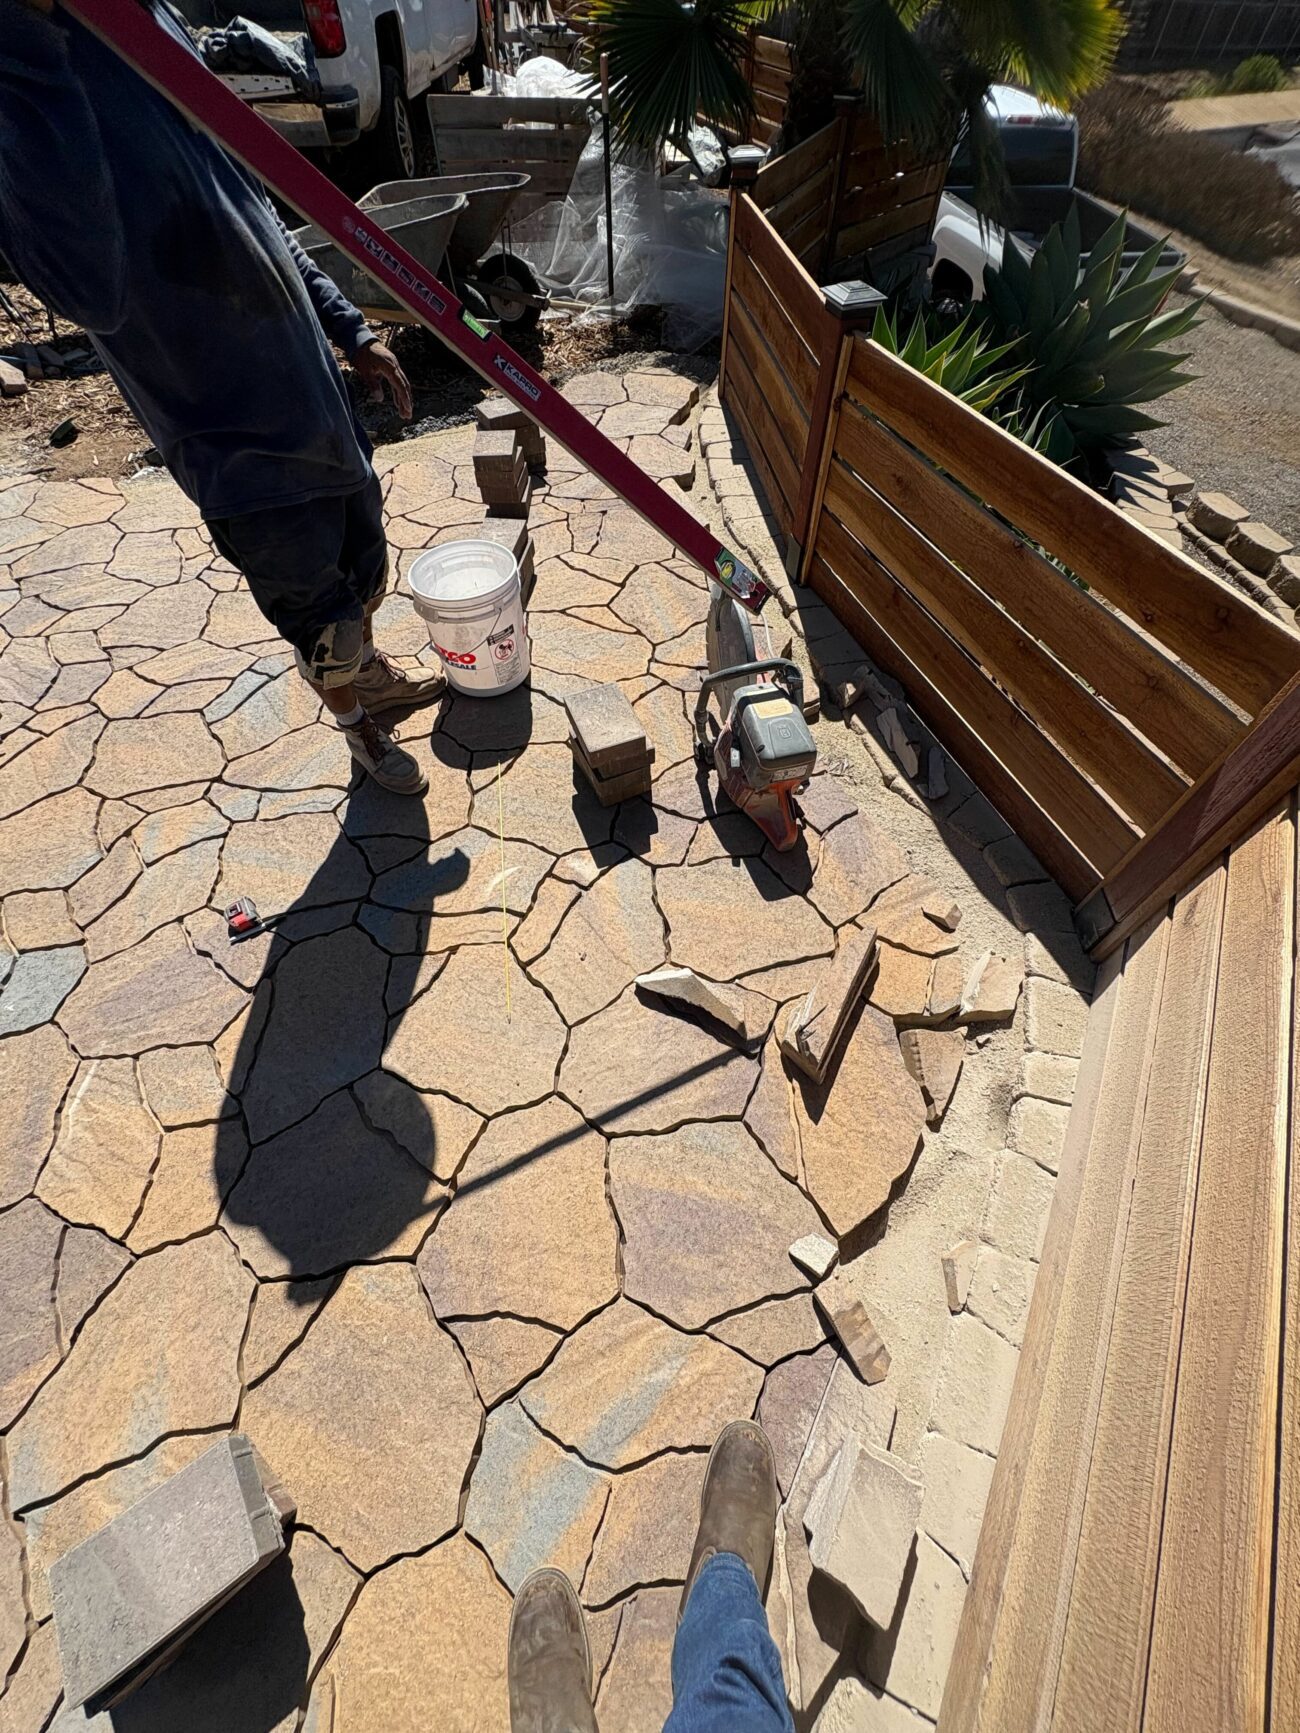
Paver Installation
ORCO Corsia four-shape pavers were laid across the 607-square-foot field in an irregular flagstone pattern. Holland 4x8 units were set as the soldier-course border. Cuts were made on-site with a wet saw. The curved walkway section wrapping to the shed was completed in the same phase.
Mow Strip and Finish Work
The 52-piece concrete mow strip was installed along paver edges to lock the perimeter. NextGel polymeric sand was swept into joints and activated. A final walk confirmed all surfaces were complete, and the balance was collected.
Investment
What would a similar project cost in El Cajon?
Toggle components on/off to estimate your project
Frequently Asked Questions
How much does a paver patio installation cost in El Cajon?
A 600-square-foot interlocking paver patio in El Cajon typically falls between $17,000 and $21,000 installed. This Bostonia project used ORCO Corsia pavers in a four-shape flagstone-style layout with a Holland 4x8 soldier-course border, drainage pipe, and a 52-piece concrete mow strip. Final invested $18,888 including the mid-install drainage retrofit. Final cost depends on paver grade, excavation depth, and whether drainage work is needed.
Do I need a permit for a paver patio in El Cajon?
A paver patio on its own does not typically require a building permit in El Cajon. Retaining walls over 3 feet tall (measured from the top of footing) do require a permit under San Diego's locally adopted code. This project included an existing segmental retaining wall; the new paver work did not add wall height, so no additional permit was needed for the hardscape.
Do paver patios require drainage in El Cajon hillside yards?
Often, especially on hillside lots. On this project, drainage pipe was added after base prep revealed that surface water was pooling near an existing retaining wall. Corrugated pipe and a graded surface now direct water away from the wall.
How do I maintain interlocking pavers after installation?
Polymeric sand like NextGel, which was used on this project, locks the joints and resists weed growth and ant tunneling. Re-sand joints every few years if erosion occurs. Rinse the surface periodically; avoid pressure-washing at high angles, which can displace joint sand. Individual pavers can be lifted and replaced if a utility repair is ever needed underneath.
How long does it take to install a paver patio in Bostonia or El Cajon?
This 607-square-foot project in Bostonia finished in about a week on site. The schedule included native soil compaction, a drainage addition mid-project, curved paver installation, and mow strip work. Simpler flat layouts on level lots can move faster; drainage or grading work adds time.
What are ORCO Corsia pavers and why are they used for residential patios?
ORCO Corsia pavers come in four distinct shapes that fit together to mimic an irregular flagstone pattern. They give a natural stone look with the consistency and structural performance of concrete interlocking pavers. On this El Cajon project, the Corsia field was paired with ORCO Holland 4x8 units set as a soldier-course border to define the patio edge.
Your Outdoor Project in 3 Simple Steps
Design
We listen to your vision, assess your space, and create a custom design that fits your lifestyle and budget.
Build
Our experienced crews bring the design to life with premium materials and expert craftsmanship.
Enjoy
Step into your transformed outdoor space and start making memories with family and friends.
Your Project Manager

Troy MacMillan
A San Diego native with more than 20 years in landscape construction, Troy brings seasoned craftsmanship to every build. A devoted husband and father of two, he carries the same care from the job site to his weekend farm.
More Projects
More from Troy MacMillan
Oceanside Paver Driveway, Turf Grid, and Front Entry Remodel
Oceanside
Paver-and-Turf Grid Backyard in Vista
Vista
A 20-Foot Outdoor Kitchen Under a Pergola
Carlsbad
From the Front Door to the Pergola, One Paver
San Marcos
Evergreen Front and Back Yards, San Marcos Highlands
San Marcos
Cracked Concrete Out, Pavers In - Mission San Luis Rey
Oceanside
Ready to Transform Your Outdoor Space?
Let's discuss your project and bring your vision to life.